H3C EVPN VXLAN 从 0 到 1 完整实验教程
更适合小白食用
一、实验目标
本文基于一套已经打通的 H3C EVPN VXLAN 实验拓扑,从 0 到 1 重新梳理整套方案的实现逻辑,重点讲清楚:
- 4 台设备分别承担什么角色
- Underlay 和 Overlay 如何配合
- EVPN、VXLAN、VSI、VNI、L3VNI、分布式网关分别是什么
- 为什么要先配什么、后配什么
- 每条关键命令的作用和联动关系
- 如何把整套配置真正敲出来,而不是只会看结果
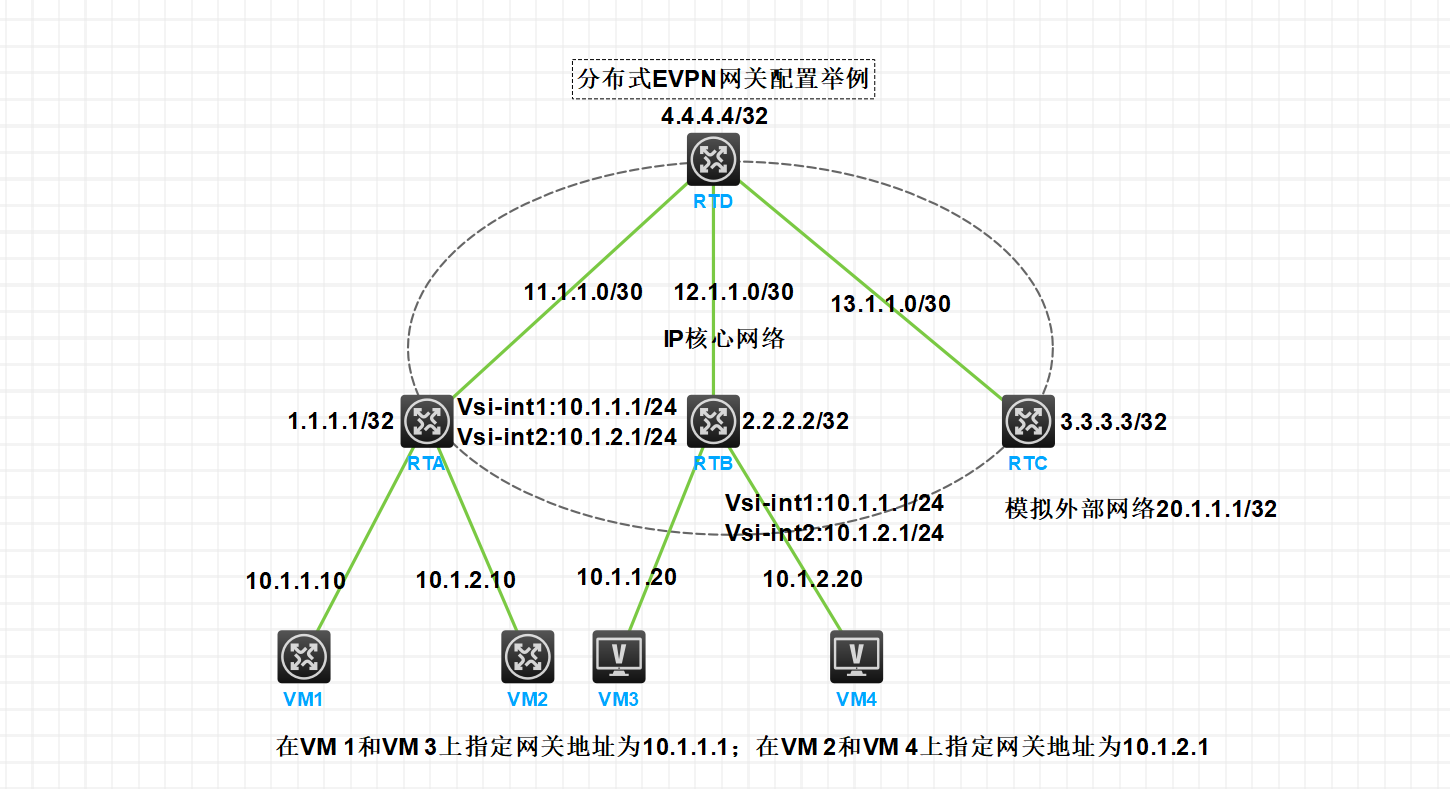
二、实验拓扑角色划分
RTD
Underlay 核心 + EVPN RR
- 三层互联核心
- EVPN 路由反射器
- 不接终端
- 不做业务网关
RTA
VTEP + 二层接入 + 分布式网关
- 接入 VM1 / VM2
- 承载二层 VNI
- 承载三层网关
- 参与 L3VNI
RTB
VTEP + 二层接入 + 分布式网关
- 接入 VM3 / VM4
- 承载二层 VNI
- 承载三层网关
- 参与 L3VNI
RTC
L3VNI 节点 + 外部前缀注入点
- 不做二层接入
- 参与 vpn1 的三层转发
- 注入 20.1.1.1/32
三、整套网络的三层逻辑
1)Underlay
Underlay 只做一件事:保证设备之间 IP 可达。
- RTA — RTD:11.1.1.0/30
- RTB — RTD:12.1.1.0/30
- RTC — RTD:13.1.1.0/30
Loopback0:
- RTA:1.1.1.1/32
- RTB:2.2.2.2/32
- RTC:3.3.3.3/32
- RTD:4.4.4.4/32
2)Overlay
Overlay 负责传输 EVPN 控制平面 信息。
- RTD 是 RR
- RTA / RTB / RTC 是 RR Client
3)业务层
- vpna → VNI 10 → 10.1.1.0/24
- vpnb → VNI 20 → 10.1.2.0/24
- vpn1 → L3VNI 1000
- RTA / RTB 同时提供 10.1.1.1、10.1.2.1 分布式网关
- RTC 提供 20.1.1.1/32 外部前缀
四、先讲透:VSI 和 Vsi-interface 到底是什么
这一段是整篇最关键、最容易混淆的地方。
1)什么是 vsi
vsi vpna
vsi vpnb它表示:创建一个二层业务实例。
2)什么是 interface Vsi-interface 1
interface Vsi-interface 1
interface Vsi-interface 2
interface Vsi-interface 3它表示:创建一个三层 VSI 接口。
重点:在 H3C 上,进入 interface Vsi-interface 1 视图时,本身就是在创建这个接口。
3)VSI 和 Vsi-interface 的关系
先有三层接口侧概念:
interface Vsi-interface 1
ip binding vpn-instance vpn1
ip address 10.1.1.1 255.255.255.0
distributed-gateway local
然后再在二层 VSI 下进行关联:
vsi vpna
gateway vsi-interface 1
一句话总结:
先有 Vsi-interface 这个三层接口对象,再在 vsi 里通过 gateway vsi-interface 进行绑定,学习顺序会更顺。
五、配置顺序为什么必须这样安排
- 基础接口和 IP 地址
- Underlay OSPF
- 验证 Loopback 可达
- 建立 BGP EVPN 邻居
- 创建 VRF / VPN 实例
- 开启 VXLAN / L2VPN 基础能力
- 先创建 Vsi-interface 接口
- 再创建二层 VSI,并通过 gateway vsi-interface 绑定
- 分布式网关
- 接入口 xconnect
- RTC 注入外部前缀
- 完整配置汇总
- 验证与排错
六、地址规划
| 设备 | 地址规划 |
|---|---|
| RTD | Loopback0:4.4.4.4/32;GE0/0:11.1.1.1/30;GE0/1:12.1.1.1/30;GE0/2:13.1.1.1/30 |
| RTA | Loopback0:1.1.1.1/32;GE0/0:11.1.1.2/30;GE0/1:接入 10.1.1.0/24;GE0/2:接入 10.1.2.0/24 |
| RTB | Loopback0:2.2.2.2/32;GE0/0:12.1.1.2/30;GE0/1:接入 10.1.1.0/24;GE0/2:接入 10.1.2.0/24 |
| RTC | Loopback0:3.3.3.3/32;Loopback1:20.1.1.1/32;GE0/0:13.1.1.2/30 |
七、第一阶段:配置 Underlay
目标:4 台设备三层互通,4 个 Loopback 地址互通,为后续 EVPN 邻居建立提供基础。
7.1 RTD 配置
system-view
sysname RTD

interface LoopBack0
 ip address 4.4.4.4 255.255.255.255

interface GigabitEthernet0/0
 port link-mode route
 ip address 11.1.1.1 255.255.255.252

interface GigabitEthernet0/1
 port link-mode route
 ip address 12.1.1.1 255.255.255.252

interface GigabitEthernet0/2
 port link-mode route
 ip address 13.1.1.1 255.255.255.252

ospf 1 router-id 4.4.4.4
 area 0.0.0.0
  network 4.4.4.4 0.0.0.0
  network 11.1.1.0 0.0.0.3
  network 12.1.1.0 0.0.0.3
  network 13.1.1.0 0.0.0.3
7.2 RTA 配置
system-view
sysname RTA

interface LoopBack0
 ip address 1.1.1.1 255.255.255.255

interface GigabitEthernet0/0
 port link-mode route
 ip address 11.1.1.2 255.255.255.252

ospf 1 router-id 1.1.1.1
 area 0.0.0.0
  network 1.1.1.1 0.0.0.0
  network 11.1.1.0 0.0.0.3
7.3 RTB 配置
system-view
sysname RTB

interface LoopBack0
 ip address 2.2.2.2 255.255.255.255

interface GigabitEthernet0/0
 port link-mode route
 ip address 12.1.1.2 255.255.255.252

ospf 1 router-id 2.2.2.2
 area 0.0.0.0
  network 2.2.2.2 0.0.0.0
  network 12.1.1.0 0.0.0.3
7.4 RTC 配置
system-view
sysname RTC

interface LoopBack0
 ip address 3.3.3.3 255.255.255.255

interface GigabitEthernet0/0
 port link-mode route
 ip address 13.1.1.2 255.255.255.252

ospf 1 router-id 3.3.3.3
 default-route-advertise always
 area 0.0.0.0
  network 3.3.3.3 0.0.0.0
  network 13.1.1.0 0.0.0.3
7.5 验证命令
display ospf peer
display ip routing-table
ping 1.1.1.1
ping 2.2.2.2
ping 3.3.3.3
ping 4.4.4.4
八、第二阶段:建立 BGP EVPN 控制平面
目标:让 RTA / RTB / RTC 都通过 RTD 建立 EVPN 邻居,由 RTD 作为 RR 反射 EVPN 路由。
8.1 RTD 配置 RR
bgp 200
 group evpn internal
 peer evpn connect-interface LoopBack0
 peer 1.1.1.1 group evpn
 peer 2.2.2.2 group evpn
 peer 3.3.3.3 group evpn

 address-family l2vpn evpn
  undo policy vpn-target
  peer evpn enable
  peer evpn reflect-client
8.2 RTA 配置
bgp 200
 peer 4.4.4.4 as-number 200
 peer 4.4.4.4 connect-interface LoopBack0

 address-family l2vpn evpn
  peer 4.4.4.4 enable
8.3 RTB 配置
bgp 200
 peer 4.4.4.4 as-number 200
 peer 4.4.4.4 connect-interface LoopBack0

 address-family l2vpn evpn
  peer 4.4.4.4 enable
8.4 RTC 配置
bgp 200
 peer 4.4.4.4 as-number 200
 peer 4.4.4.4 connect-interface LoopBack0

 address-family l2vpn evpn
  peer 4.4.4.4 enable
8.5 验证命令
display bgp l2vpn evpn peer
display bgp l2vpn evpn summary
九、第三阶段:创建 VRF / VPN 实例
目标:创建租户 vpn1,为三层路由和 EVPN 地址族准备基础。
9.1 RTA 配置
ip vpn-instance vpn1
 route-distinguisher 1:1
 address-family ipv4
  vpn-target 2:2 import-extcommunity
  vpn-target 2:2 export-extcommunity
 address-family evpn
  vpn-target 1:1 import-extcommunity
  vpn-target 1:1 export-extcommunity
9.2 RTB 配置
ip vpn-instance vpn1
 route-distinguisher 1:2
 address-family ipv4
  vpn-target 2:2 import-extcommunity
  vpn-target 2:2 export-extcommunity
 address-family evpn
  vpn-target 1:1 import-extcommunity
  vpn-target 1:1 export-extcommunity
9.3 RTC 配置
ip vpn-instance vpn1
 route-distinguisher 1:3
 address-family ipv4
  vpn-target 2:2 import-extcommunity
  vpn-target 2:2 export-extcommunity
 address-family evpn
  vpn-target 1:1 import-extcommunity
  vpn-target 1:1 export-extcommunity
十、第四阶段:开启 VXLAN 基础能力
10.1 RTA 配置
l2vpn enable
vxlan tunnel arp-learning disable
vxlan tunnel mac-learning disable
10.2 RTB 配置
l2vpn enable
vxlan tunnel arp-learning disable
vxlan tunnel mac-learning disable
10.3 RTC 配置
l2vpn enable
vxlan tunnel arp-learning disable
vxlan tunnel mac-learning disable
十一、第五阶段:先创建 Vsi-interface 接口
11.1 RTA 创建 Vsi-interface
interface Vsi-interface 1
 ip binding vpn-instance vpn1
 ip address 10.1.1.1 255.255.255.0
 mac-address 0001-0001-0001
 local-proxy-arp enable
 distributed-gateway local

interface Vsi-interface 2
 ip binding vpn-instance vpn1
 ip address 10.1.2.1 255.255.255.0
 mac-address 0002-0002-0002
 local-proxy-arp enable
 distributed-gateway local

interface Vsi-interface 3
 ip binding vpn-instance vpn1
 l3-vni 1000
11.2 RTB 创建 Vsi-interface
interface Vsi-interface 1
 ip binding vpn-instance vpn1
 ip address 10.1.1.1 255.255.255.0
 mac-address 0001-0001-0001
 local-proxy-arp enable
 distributed-gateway local

interface Vsi-interface 2
 ip binding vpn-instance vpn1
 ip address 10.1.2.1 255.255.255.0
 mac-address 0002-0002-0002
 local-proxy-arp enable
 distributed-gateway local

interface Vsi-interface 3
 ip binding vpn-instance vpn1
 l3-vni 1000
11.3 RTC 创建 Vsi-interface
interface Vsi-interface 3
 ip binding vpn-instance vpn1
 l3-vni 1000
十二、第六阶段:再创建二层 VSI,并绑定二层 VNI
12.1 RTA 配置
vsi vpna
 gateway vsi-interface 1
 arp suppression enable
 vxlan 10
 evpn encapsulation vxlan
 route-distinguisher auto
 vpn-target auto export-extcommunity
 vpn-target auto import-extcommunity

vsi vpnb
 gateway vsi-interface 2
 arp suppression enable
 vxlan 20
 evpn encapsulation vxlan
 route-distinguisher auto
 vpn-target auto export-extcommunity
 vpn-target auto import-extcommunity
12.2 RTB 配置
vsi vpna
 gateway vsi-interface 1
 arp suppression enable
 vxlan 10
 evpn encapsulation vxlan
 route-distinguisher auto
 vpn-target auto export-extcommunity
 vpn-target auto import-extcommunity

vsi vpnb
 gateway vsi-interface 2
 arp suppression enable
 vxlan 20
 evpn encapsulation vxlan
 route-distinguisher auto
 vpn-target auto export-extcommunity
 vpn-target auto import-extcommunity
十三、第七阶段:配置分布式网关
相关关键命令:
ip binding vpn-instance vpn1
ip address
mac-address
local-proxy-arp enable
distributed-gateway local
十四、第八阶段:接入口加入对应的 VSI
14.1 RTA 配置
interface GigabitEthernet0/1
 port link-mode route
 xconnect vsi vpna

interface GigabitEthernet0/2
 port link-mode route
 xconnect vsi vpnb
14.2 RTB 配置
interface GigabitEthernet0/1
 port link-mode route
 xconnect vsi vpna

interface GigabitEthernet0/2
 port link-mode route
 xconnect vsi vpnb
十五、第九阶段:RTC 注入外部前缀
15.1 RTC 配置 LoopBack1
interface LoopBack1
 ip binding vpn-instance vpn1
 ip address 20.1.1.1 255.255.255.255
15.2 RTC 将直连路由引入 BGP VRF
bgp 200
 ip vpn-instance vpn1
  address-family ipv4 unicast
   import-route direct
十六、四台设备完整配置汇总
这一部分信息量最大。Markdown 版保留完整配置,但用普通代码块替代原先“每一行一个 div”的写法,移动端会轻很多。
16.1 RTD 完整配置
system-view
sysname RTD

interface LoopBack0
 ip address 4.4.4.4 255.255.255.255

interface GigabitEthernet0/0
 port link-mode route
 ip address 11.1.1.1 255.255.255.252

interface GigabitEthernet0/1
 port link-mode route
 ip address 12.1.1.1 255.255.255.252

interface GigabitEthernet0/2
 port link-mode route
 ip address 13.1.1.1 255.255.255.252

ospf 1 router-id 4.4.4.4
 area 0.0.0.0
  network 4.4.4.4 0.0.0.0
  network 11.1.1.0 0.0.0.3
  network 12.1.1.0 0.0.0.3
  network 13.1.1.0 0.0.0.3

bgp 200
 group evpn internal
 peer evpn connect-interface LoopBack0
 peer 1.1.1.1 group evpn
 peer 2.2.2.2 group evpn
 peer 3.3.3.3 group evpn

 address-family l2vpn evpn
  undo policy vpn-target
  peer evpn enable
  peer evpn reflect-client
16.2 RTA 完整配置
system-view
sysname RTA

ip vpn-instance vpn1
 route-distinguisher 1:1
 address-family ipv4
  vpn-target 2:2 import-extcommunity
  vpn-target 2:2 export-extcommunity
 address-family evpn
  vpn-target 1:1 import-extcommunity
  vpn-target 1:1 export-extcommunity

l2vpn enable
vxlan tunnel arp-learning disable
vxlan tunnel mac-learning disable

interface LoopBack0
 ip address 1.1.1.1 255.255.255.255

interface GigabitEthernet0/0
 port link-mode route
 ip address 11.1.1.2 255.255.255.252

interface GigabitEthernet0/1
 port link-mode route
 xconnect vsi vpna

interface GigabitEthernet0/2
 port link-mode route
 xconnect vsi vpnb

ospf 1 router-id 1.1.1.1
 area 0.0.0.0
  network 1.1.1.1 0.0.0.0
  network 11.1.1.0 0.0.0.3

interface Vsi-interface 1
 ip binding vpn-instance vpn1
 ip address 10.1.1.1 255.255.255.0
 mac-address 0001-0001-0001
 local-proxy-arp enable
 distributed-gateway local

interface Vsi-interface 2
 ip binding vpn-instance vpn1
 ip address 10.1.2.1 255.255.255.0
 mac-address 0002-0002-0002
 local-proxy-arp enable
 distributed-gateway local

interface Vsi-interface 3
 ip binding vpn-instance vpn1
 l3-vni 1000

vsi vpna
 gateway vsi-interface 1
 arp suppression enable
 vxlan 10
 evpn encapsulation vxlan
 route-distinguisher auto
 vpn-target auto export-extcommunity
 vpn-target auto import-extcommunity

vsi vpnb
 gateway vsi-interface 2
 arp suppression enable
 vxlan 20
 evpn encapsulation vxlan
 route-distinguisher auto
 vpn-target auto export-extcommunity
 vpn-target auto import-extcommunity

bgp 200
 peer 4.4.4.4 as-number 200
 peer 4.4.4.4 connect-interface LoopBack0

 address-family l2vpn evpn
  peer 4.4.4.4 enable
16.3 RTB 完整配置
system-view
sysname RTB

ip vpn-instance vpn1
 route-distinguisher 1:2
 address-family ipv4
  vpn-target 2:2 import-extcommunity
  vpn-target 2:2 export-extcommunity
 address-family evpn
  vpn-target 1:1 import-extcommunity
  vpn-target 1:1 export-extcommunity

l2vpn enable
vxlan tunnel arp-learning disable
vxlan tunnel mac-learning disable

interface LoopBack0
 ip address 2.2.2.2 255.255.255.255

interface GigabitEthernet0/0
 port link-mode route
 ip address 12.1.1.2 255.255.255.252

interface GigabitEthernet0/1
 port link-mode route
 xconnect vsi vpna

interface GigabitEthernet0/2
 port link-mode route
 xconnect vsi vpnb

ospf 1 router-id 2.2.2.2
 area 0.0.0.0
  network 2.2.2.2 0.0.0.0
  network 12.1.1.0 0.0.0.3

interface Vsi-interface 1
 ip binding vpn-instance vpn1
 ip address 10.1.1.1 255.255.255.0
 mac-address 0001-0001-0001
 local-proxy-arp enable
 distributed-gateway local

interface Vsi-interface 2
 ip binding vpn-instance vpn1
 ip address 10.1.2.1 255.255.255.0
 mac-address 0002-0002-0002
 local-proxy-arp enable
 distributed-gateway local

interface Vsi-interface 3
 ip binding vpn-instance vpn1
 l3-vni 1000

vsi vpna
 gateway vsi-interface 1
 arp suppression enable
 vxlan 10
 evpn encapsulation vxlan
 route-distinguisher auto
 vpn-target auto export-extcommunity
 vpn-target auto import-extcommunity

vsi vpnb
 gateway vsi-interface 2
 arp suppression enable
 vxlan 20
 evpn encapsulation vxlan
 route-distinguisher auto
 vpn-target auto export-extcommunity
 vpn-target auto import-extcommunity

bgp 200
 peer 4.4.4.4 as-number 200
 peer 4.4.4.4 connect-interface LoopBack0

 address-family l2vpn evpn
  peer 4.4.4.4 enable
16.4 RTC 完整配置
system-view
sysname RTC

ip vpn-instance vpn1
 route-distinguisher 1:3
 address-family ipv4
  vpn-target 2:2 import-extcommunity
  vpn-target 2:2 export-extcommunity
 address-family evpn
  vpn-target 1:1 import-extcommunity
  vpn-target 1:1 export-extcommunity

l2vpn enable
vxlan tunnel arp-learning disable
vxlan tunnel mac-learning disable

interface LoopBack0
 ip address 3.3.3.3 255.255.255.255

interface GigabitEthernet0/0
 port link-mode route
 ip address 13.1.1.2 255.255.255.252

interface LoopBack1
 ip binding vpn-instance vpn1
 ip address 20.1.1.1 255.255.255.255

ospf 1 router-id 3.3.3.3
 default-route-advertise always
 area 0.0.0.0
  network 3.3.3.3 0.0.0.0
  network 13.1.1.0 0.0.0.3

interface Vsi-interface 3
 ip binding vpn-instance vpn1
 l3-vni 1000

bgp 200
 peer 4.4.4.4 as-number 200
 peer 4.4.4.4 connect-interface LoopBack0

 address-family l2vpn evpn
  peer 4.4.4.4 enable

 ip vpn-instance vpn1
  address-family ipv4 unicast
   import-route direct
十七、最终验证思路
17.1 二层互通验证
display mac-address
display vxlan tunnel
display bgp l2vpn evpn routing-table
17.2 三层互通验证
ping 10.1.1.x
ping 10.1.2.x
17.3 ARP / 主机路由验证
display arp vpn-instance vpn1
display ip routing-table vpn-instance vpn1 protocol direct
display ip routing-table vpn-instance vpn1 protocol bgp
display ip routing-table vpn-instance vpn1 protocol evpn
17.4 VRF 路由验证
display ip routing-table vpn-instance vpn1十八、常见排错思路
1)Loopback 不通
先查 Underlay:
display ospf peer
display ip routing-table
ping 4.4.4.4
2)EVPN 邻居不起
先查:
- Loopback 是否可达
- BGP 邻居地址是否正确
connect-interface LoopBack0是否已配置- RR 上是否启用了
peer evpn reflect-client
查看命令:
display bgp l2vpn evpn peer
display bgp l2vpn evpn summary
3)二层主机不通
先查:
vsi是否创建vxlan 10 / 20是否正确- 接口是否执行
xconnect vsi - EVPN Type-2 路由是否学习到
- MAC 表是否正常生成
查看命令:
display mac-address
display bgp l2vpn evpn routing-table
display vxlan tunnel
4)三层互访不通
先查:
Vsi-interface是否绑定到vpn1- 网关 IP 是否正确
distributed-gateway local是否已配置l3-vni 1000是否在各节点存在- RTC 是否把
20.1.1.1/32引入到 BGP VRF
查看命令:
display ip routing-table vpn-instance vpn1
display arp vpn-instance vpn1
display bgp vpnv4 all routing-table
十九、全文总结
- Underlay 负责打通设备 IP 可达
- Overlay 负责 EVPN 控制平面发布与学习
Vsi-interface是三层接口对象vsi是二层业务实例- 先建
Vsi-interface,再在vsi里做gateway vsi-interface绑定,逻辑最清晰 - RTA / RTB 同时承载二层 VNI、三层网关、L3VNI
- RTC 负责引入外部前缀到 vpn1
- RTD 作为 RR,负责 EVPN 路由反射
到这里,这套 H3C EVPN VXLAN 分布式网关实验,就算真正从“看懂”走到了“能独立敲出来”。
二十、针对博客性能的优化说明
这版 Markdown 相比你原来那篇重 HTML 文章,主要做了这些性能优化:
- 去掉了文章内部的大段
<style> - 去掉了每一行代码单独一个
div的写法 - 改成标准 Markdown 标题、列表、表格、代码块
- 保留阅读层次,但尽量减少不必要的嵌套
- 更适合手机端和 Typecho 内容页渲染
如果你博客首页现在还是“显示全文”,建议再额外改成“只显示摘要”,否则长文依然会拖慢首页列表页。